
News
How to Setup and Enable Remote Desktop on your Windows 11 PC | Ways to Turn On and use Windows 11 Remote Desktop(RDP)
After six long years, Microsoft has finally updated its Windows operating system. The brand new Windows 11 has been a revelation when it comes to performance, specs, graphics, and design compared to its predecessor, Windows 10. In this article, we shall go through several ways which would help you to enable or set up a Remote Desktop Connection in your Windows 11. If you happen to do so, you are at the right place, and we recommend you go through the entire article to be guided well.
The Remote Desktop feature is a vital feature on the Windows operating system. It allows users to access their own or other devices remotely. This means the whole process can be divided and understood in two points; Enabling the Remote Desktop Feature and Setting or Connecting the two enabled devices. Even though this process is similar to Windows 10, some of the options might vary on the new Windows 11.
- Enabling/Setting up Remote Desktop on your Windows 11 PC
- How to Enable the Remote Desktop via Settings?
- Enabling the Remote Desktop on Windows 11 via Control Panel
- How to Set Up Remote Desktop in Windows 11?
- How to Use Remote Desktop in Windows 11?
- Remote Desktop Connection via App
- Alternate Method
- Microsoft Remote Desktop
- Chrome Remote Desktop Windows 11
- Process of allowing remote connections on Windows Firewall
Enabling/Setting up Remote Desktop on your Windows 11 PC
To set up and enable the Remote Desktop Feature on your new Windows 11, Read and apply the given steps mentioned in the guidelines.
How to Enable the Remote Desktop via Settings?
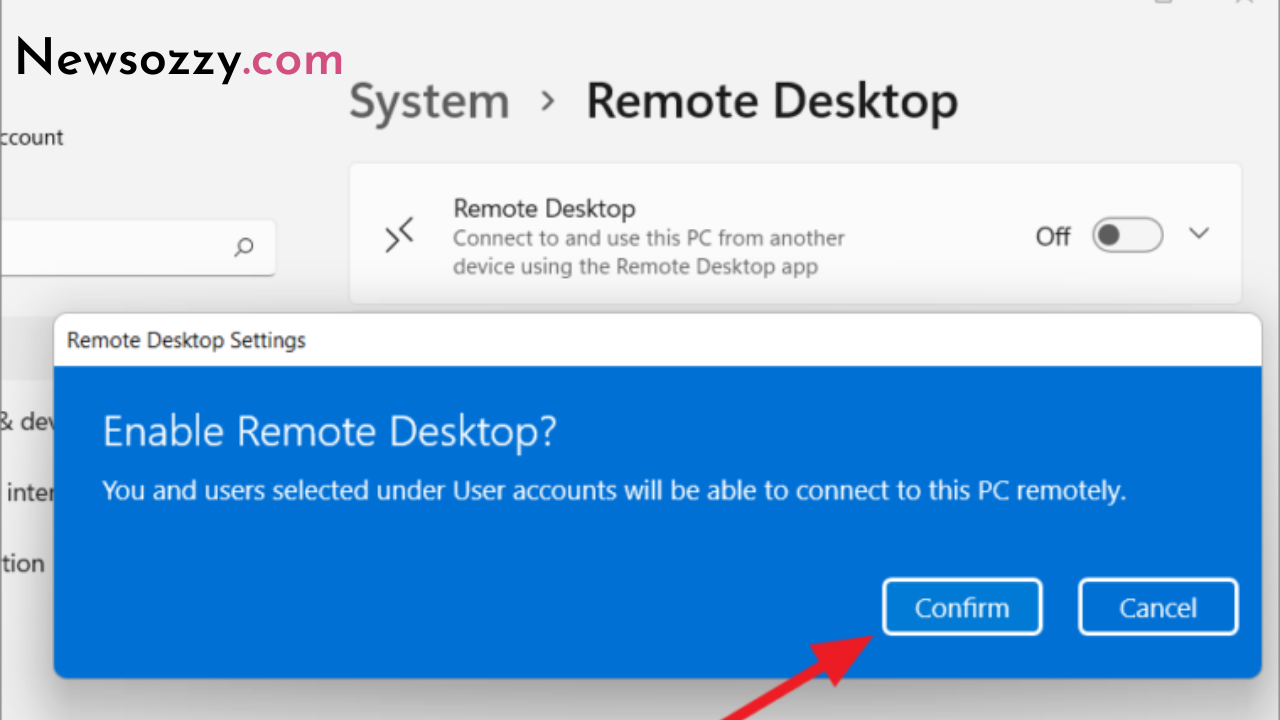
Before you connect to a Remote Desktop, you must first enable this specific setting on your Windows 11 run PC. There are two methods of doing the same. The first method is using the Settings Menu or using the Control Panel. For enabling this particular setting through the control Panel –
- Press keys (WinKey + I) to open up the Settings app
- Select the ‘System’ followed by selecting the ‘Remote Desktop’ on the right-side panel.
- Enable the feature by sliding the toggle switch onto the right.
- Right below this particular setting, you will find an option that allows Remote Desktop Users.
- Enter the User’s email ID or your Computer’s name, which you want to access your device from.
- Click on ‘OK’ to save and proceed.
You’ve successfully completed the setup, and you can now control the Computer remotely.
Also, See: Assign a Static IP Address in Windows 11
Enabling the Remote Desktop on Windows 11 via Control Panel
The Control Panel also provides a solution for enabling the Remote Desktop on the new Windows 11. Follow the given steps –
- Press keys (WinKey + Q) to launch a Search window.
- Type out “Advanced System Setting” on the above text field.
- Click on the top matching result.
- On the System Properties window, head to the ‘Remote‘ tab.
- Check the box under the Remote Assistance menu – “Allow Remote Assistance Connections to this Computer. “
- In the same way, check the box “Allow Remote Connections to this computer” under Remote Desktop.
- You can even opt for ‘Select users’ and enter the email ID of all the users you want to allow access to your computer remotely.
- Press on ‘Add’ and then fill in the necessary details. Press on ‘OK’ to save the changes.
Note: If you happen to set up your Computer on sleep or hibernate when kept unused, head over to the Power Option in the Control Panel and change this particular setting. If you don’t change this setting, people won’t access your PC when it goes to hibernate or sleep mode.
- Click on ‘Apply’ and then press ‘OK’ to confirm these settings.
How to Set Up Remote Desktop in Windows 11?
How to Use Remote Desktop in Windows 11?
Now that we have finally enabled the Remote Desktop on the Windows 11 computer, we will look at ways to set it up on your Windows 11 device. Let us look at how you can connect Remote Desktop on your Windows 11 machine –
1) Remote Desktop Connection via App
All the latest versions of Windows 11 come pre-equipped with an inbuilt tool named “Remote Desktop Connection.” To control devices remotely, you can follow these steps –
- Press Keys (WinKey + S) to open up the Search window.
- Type out ‘Remote Desktop’ on the search bar.
- Select the top result from the list, which would be named ‘Remote Desktop Connection.’
- Type out the Computer’s name in the given Computer’s field, the names you want a connection with.
- After you’ve entered the Remote Desktop Details, press ‘Connect.’
- If you were connected to any device, use the drop-down menu to select the preferred option.
- Another way of doing so is to connect to your computer remotely by using its username.
- This option is not visible by default, so you must enable it by clicking on ‘Show Options.’
Note: If you wish to save the username or computer name, check the “Allow me to Save Credentials” box.
- A pop-up appears, which requests the password.
- Fill in the password and click on ‘Connect’ again.
2) Alternate Method
The Remote Desktop Connection is a fantastic way to connect to another device remotely. However, there are cases when this feature does not work efficiently on your device. There are other existing options available to help resolve issues in such cases. We have a few tools discussed below (either available from the Windows Store or from any external source)
Microsoft Remote Desktop
This application was developed by the Microsoft team, which works perfectly to connect your device to a remote Computer or even virtual applications. Firstly, you would have to download this application and install it on your computer.
- When you’re finally done installing the app, double-click on the icon.
- Once you’re on the application interface, press “+ Add” and then go on to select PCs and Workspaces.
- Enter information like PC name, User Account, and optional details like display name.
- Click on the Save button to enlist this device as one of your own Devices.
- When you’ve entered the necessary information, head back to the saved devices section.
- Click on the computer title and all the connections to establish.
- A pop-up may appear asking to fill in the required passkey.
- Provide the passkey, and once connected, you will be able to control the remote device effectively.
Chrome Remote Desktop Windows 11
Google’s own web browser Chrome has some remote desktop extensions which you can easily use to control devices remotely.
See More: Align Windows 11 Taskbar Icons to the Left
Process of allowing remote connections on Windows Firewall
Whenever you opt to set up a remote connection on your device, you must change the remote desktop setting on the Windows Firewall. When you haven’t allowed it on the Windows Firewall, it will block any incoming connections on your device. This is how you figure out the firewall setting configuration –
- Open the Control Panel.
- Once it opens, click on the ‘Windows Defender Firewall.’
- Click on the ‘Allow an app or feature through Window Defender Firewall’ present on the left side.
- Now, click on the link ‘Change settings’.
- Scroll down and mark the checkboxes ‘Remote Assistance’ and ‘Remote Desktop.’
- Once you’re done checking off the boxes, on both the private ones and the public, click on the ‘OK’ button.
You will have to restart your PC to save and bring the changes into effect.
We hope you know how to enable and set up Remote Desktop on your latest Windows 11 PC. Let us know if you’re facing any issues or you have any other queries in the comments.


-

 News2 years ago
WhatsApp DP for Students to Free Download | Creative WhatsApp Profile Picture Images that Make you Smile
-

 News2 years ago
Top 100 Funny Group Chat Names for WhatsApp & Other Social Media Apps | Best Cute Cool Fun Ideas for Group Names
-

 News2 years ago
Morning Assembly Word of the Day List for Students | Best Word of the Day for High School Students
-

 News2 years ago
Best Cute Funny Throwback Picture Captions 2022 | Unique Flashback Quotes for Instagram Posts & Stories
-

 News3 years ago
100+ Best Captions for Brother’s Handsome Photo That You Can Copy And Paste Easily
-

 Instagram2 years ago
Top 200+ Best Cute Cool Instagram Bio Ideas of 2022 That You Can Copy-Paste Easily
-

 News2 years ago
100+ Best Cute Sweet Funny Instagram Captions for Sisters Photo | Get Free IG Quotes & Puns for Sisters Selfies
-

 News2 years ago
What are Some Cool Funny Activities for College Students? | Best Tasks for Party Games