
News
How do I Set the Limit Bandwidth on a Netgear Router? [genie, N-Series]
Limit Bandwidth Netgear: Netgear is undoubtedly one of the best when it comes to routers for internet sharing. It is far easier to monitor traffic as well as control bandwidth on this router when compared to any other. But it is also pretty expensive when considering other routers.
The best Netgear model is not the quick-fix to solve the speed issues, though. The internet speed will get laggy if there are too many clients connected to the router to browse on the internet. In this article, we will be looking at how you can limit bandwidth gear using the Netgear router.
The easiest way to limit the bandwidth on Netgear is to follow the steps given below:
- Go to ‘Advanced.’
- Then to ‘Setup.
- Next is ‘QoS SETUP.’
- After this, you can add ‘Rule’ to limit bandwidth gear.’
However, if you need a more elaborate guide to go about doing this, this is the perfect article that can help you.
Please note that while there are many different Netgear models, the QoS setup is practically similar for all of these. There are also guides to help in limiting WiFi speed for other different devices that you can refer to. The most common models when it comes to Netgear that are featured here are:
- N150 (Model: WNR1000v3)
- N300 (Model: DGN2200)
- Netgear Router Series: N600 (Model: WNDR3400v3)
- Nighthawk R7000
- Nighthawk R6300
What is Netgear Router?
Netgear does not offer an allocation limit for the bandwidth for other clients. But it does have options that allow you to set the priorities for the devices that are important. It is the bandwidth usage that the QoS setup in the Netgear router depends on, and we will be looking at this in more detail below.
There are routers that give you the feature where you can limit the bandwidth that can be set for various devices in accordance with your preferences. While this is a great set-up for you, it’s not the same when other devices are to be considered.
Let’s say that you have a 100 MBPS broadband connection and you set a 2 MBPS limit to a certain device. Regardless of whether or not you are using the said connection, the native won’t be able to use the remaining bandwidth that is available but lies unused. This is where Netgear comes in because it has the best solution for this particular issue.
You can set high priority for your own devices using Netgear and place other selected devices to be ‘low priority.’ The set-up now gives you the first priority so that you can download as you wish at complete speed, and the other devices will also have access to the entire bandwidth when the high-priority ones are not being used. This excellent set-up is one that Netgear offers.
Here are some methods you can use to limit bandwidth gear using some of the different models of Netgear.
There are three main types of models that we will be looking at in this article. All of the models that we mention should have the same procedure.
- Method 1: Nighthawk R7000 (Netgear genie)
- Method 2: R6300 (Netgear genie)
- Method 3: WNR1000v3 (Netgear SMART WIZARD)
Control the WiFi Speed on the Netgear genie (R7000) for the Other Devices
This particular model has three QoS setups that are Upstream, Downstream, as well as WMM. In this particular model, you will be working with Upstream QoS.
- First, you need to press ‘ADVANCED,’ after which ‘Setup’ should be selected under the WPS Wizard.
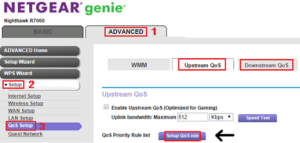
- There will be a list that appears from which you need to press QoS Setup and click on ‘Setup QoS rule’ that will appear under the ‘Upstream QoS’ tab.
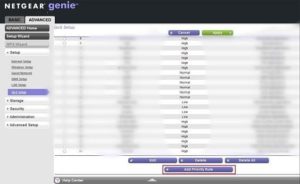
- Next, select and click on ‘Add Priority Rule’ from the options that appear.
- You will have a tab open and you can check for ‘Priority Category’ here, from which you need to choose ‘MAC Address’ from the list that drops down. From there you can use the MAC address to select the device from the list.
- Then you will see the ‘Priority’ option from which you can choose the ‘Normal’, ‘High’, or ‘Low’ priority as you wish for the device.
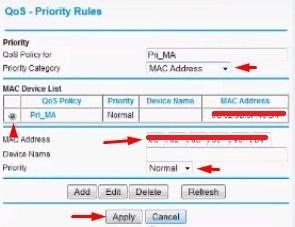
Once you’ve done all these things, click on ‘Apply.’ You will see that you can now limit bandwidth gear if you have followed all the steps exactly as they have been listed here. The other devices that are connected to the Netgear router will have a speed limited when you need higher data for your own device.
Limiting WiFi Speed on Netgear genie (R6300) for Others
The R6300 model’s QoS setup is a bit different as compared to the other models. It lists the settings out one by one instead of showing tabs. Let’s take a look at how you can limit bandwidth gear in this model.
- Firstly, you need to press on the tab that says ‘Advanced,’ and then press ‘Setup,’ which you will find in the WPS Wizard tab.
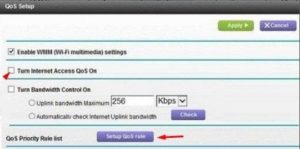
- Then press on QoS Setup, and when you see the option to ‘Turn Internet Access QoS On,’ tick it and press ‘Apply’, after which you need to press ‘Setup QoS rule’.
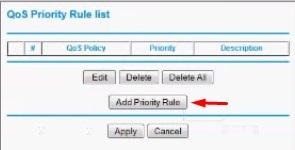
- Click on ‘Add Priority Rule‘ from the options that appear.
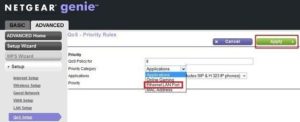
- You will see a new tab, and from here, press ‘Priority Category’ and then ‘MAC Address’ as you find them in the menu. Then you will need to select the drive you want, and then automatically, the MAC address will be taken.
- Look for the option that says ‘Priority and select the ‘Normal,’ ‘High’ or ‘Low’ priority as you want, then press ‘Apply.’
Netgear N600 series routers (WNDR3400) too will work the exact same way as has been mentioned above.
Setting WiFi Speed Priority Rule on Netgear (SMART WIZARD)
Here we will look at how to limit bandwidth gear on the N150 series router, model: WNR1000v3. This is a very common router that people often choose. Like the genie models of Netgear, the same priority rule settings exist for SMART WIZARD as well.
- The first thing that you need to do is to open the admin panel of this router by going to 192.168.1.1.
- Under ‘Advanced,’ you will see the ‘QoS Setup’ option on the left side that you need to click on.
- Then when you see ‘Turn Internet Access QoS On,’ tick it and press the button that says ‘Apply.’ The next thing to do is to press the option for ‘Setup QoS rule’.
- You will see ‘QoS Priority Rule list’ that will then appear on a window, and from here, you need to select ‘Add Priority Rule.’
- The last thing to do is to select the MAC Address, after which you need to select the device from the list so that you can configure the QoS and then press ‘Apply.’
This is the easy process that you can follow to be able to limit the speed of the WiFi on the Netgear router. This is the simple procedure to limit the wifi speed on the Netgear router.
Limiting Internet Speed on Netgear to LAN Devices
The process is pretty much the same till you get to the option to add ‘Priority.’ Once you’ve selected the Ethernet LAN Port, if there are any connected devices, they will show up. After this, you need to select the devices and choose the Normal,’ ‘High’ or ‘Low’ priority as you want to.
The process is to be followed as is given here:
- LAN: QoS Setup
- Setup QoS rule
- Add Priority Rule
- Ethernet LAN Port
- Set Priority
- Apply
FAQs on Limit Bandwidth Netgear Router
1. How can you monitor bandwidth usage and set the traffic meter?
The process is very simple, and all you need to do is to access ‘Advanced Setup’ from where you need to choose ‘Traffic Meter.’ Then a window will appear with a form where you can easily edit the limit for monthly data usage. Select the ‘Enable Traffic Meter’ so that the feature will be turned on, and you can put in the data transfer limit in MB. Lastly, press ‘Apply.’
2. How do I find the MAC address on the Netgear router of all the connected devices?
First, you need to go to ‘Advanced,’ then to ‘WPS Wizard.’ From here, click on ‘Security,’ and finally on ‘Access Control’. All of the devices that are connected to the router will be displayed here with the MAC Address which you can check and copy if you need to.
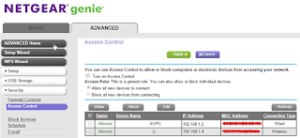
There are also options that let you ‘Allow’ or ‘Block’ devices as you desire, but you need to press on ‘Turn on Access Control’ and then ‘Apply.’


-

 News2 years ago
WhatsApp DP for Students to Free Download | Creative WhatsApp Profile Picture Images that Make you Smile
-

 News2 years ago
Top 100 Funny Group Chat Names for WhatsApp & Other Social Media Apps | Best Cute Cool Fun Ideas for Group Names
-

 News2 years ago
Morning Assembly Word of the Day List for Students | Best Word of the Day for High School Students
-

 News2 years ago
Best Cute Funny Throwback Picture Captions 2022 | Unique Flashback Quotes for Instagram Posts & Stories
-

 News3 years ago
100+ Best Captions for Brother’s Handsome Photo That You Can Copy And Paste Easily
-

 Instagram2 years ago
Top 200+ Best Cute Cool Instagram Bio Ideas of 2022 That You Can Copy-Paste Easily
-

 News2 years ago
100+ Best Cute Sweet Funny Instagram Captions for Sisters Photo | Get Free IG Quotes & Puns for Sisters Selfies
-

 News2 years ago
What are Some Cool Funny Activities for College Students? | Best Tasks for Party Games